Bathroom Renovation – Where to Start and What to Choose
By Gina Bonk,
Are you feeling overwhelmed by the thought of a bathroom renovation? Don’t worry; I’ve got you covered! A bathroom renovation can be exciting and refreshing, especially when you have a clear plan. Let’s break it down step-by-step so you can transform your space with confidence.
Step 1: Assess Your Current Bathroom
First, take a good look at your current bathroom. What do you love? What needs to go? Jot down your thoughts. This will help you identify your priorities and visualize your dream bathroom.
Step 2: Set a Budget
Before diving into the fun part — choosing tiles and flooring — set a budget. Knowing your financial limits helps guide your choices and avoid surprises.
Step 3: Get Inspired
Browse through magazines, Pinterest, and Instagram for inspiration. Save photos of bathrooms that catch your eye. Pay attention to tile patterns, colors, and flooring styles. This will help you communicate your vision to your Flooring Consultant.
Step 4: Choose Your Tile
Tiles can dramatically change the look and feel of your bathroom. Here are a few popular choices:
- Subway Tiles: Classic and versatile, subway tiles are a safe bet. Opt for a glossy white for a clean, timeless look. Want something bolder? Go for colored or textured subway tiles.
- Hexagon Tiles: Perfect for a modern touch, hexagon tiles can be used on both floors and walls. Try a monochrome palette for a chic finish.
- Mosaic Tiles: Ideal for adding a splash of color or intricate patterns. Use them for shower floors, backsplashes, or accent walls.
Step 5: Select Your Flooring
Your bathroom floor needs to be durable and water-resistant. Here are some fantastic options:
- Porcelain Tiles: Highly durable and available in various styles, porcelain tiles can mimic natural stone or wood. This makes them both stylish and practical.
- Ceramic Tiles: Another durable option, ceramic tiles come in countless designs and colors. They’re a great way to add personality to your bathroom.
- Luxury Vinyl Tiles (LVT): If you love the look of wood but need something water-resistant, LVT is your answer. It’s softer underfoot and easy to maintain.
Step 6: Professional Installation
Now that you’ve chosen your tiles and flooring, it’s time to bring in the professionals. Our skilled installers will ensure that your vision comes to life seamlessly. At Creative Carpet & Flooring, we have expert installers who can handle every detail with precision. We will work with you to schedule the installation. Clear communication is key to ensuring a smooth process.
Step 7: Enjoy the Transformation
Once the installation is complete, step back and admire your new bathroom. You’ve created a beautiful, functional space that you’ll enjoy for years to come.
Example Installation: Modern Elegance
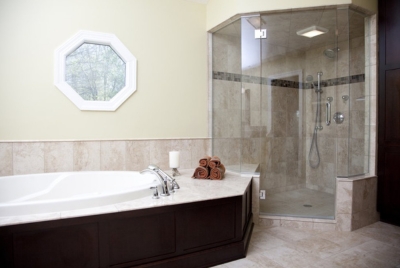
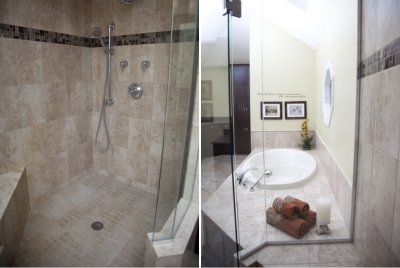
Let’s look at a recent project to give you some inspiration. Our team installed large-format porcelain tiles in a marbled cream and brown for the floor and shower. For the shower, we added a mosaic tile strip in shades of dark brown and grey, serving as an accent, creating a stunning focal point and popping the rich deep brown surrounding the tub. The final touch was luxury vinyl tiles with a wood-look finish for the vanity area, blending elegance with durability.
Final Thoughts
A bathroom renovation doesn’t have to be daunting. With the right plan and professional help, you can turn your bathroom into a sanctuary. Ready to start your bathroom redo? Visit us at Creative Carpet & Flooring in Highland, Indiana, or Mokena, Illinois. We’re here to make your dream bathroom a reality.
Feel free to visit us or contact us for more personalized advice. We love helping our clients create spaces they adore.


